1. Wait without delay
Probably every hobbyist who starts to program Arduinos stumbles over
the problem of delaying a function sequence without blocking a task
to be carried out at the same time, in short: he is confronted with
the delay() problem.
Many others before me have shown that the problem can be easily
solved as follows:
    static uint32_t msPrevious = millis();
    if (millis() - msPrevious >= msWait)
    {
      doSomething();          // do the task
      msPrevious = millis();  // keep the current millis for the next call
    }
Instead of thinking about these lines over and over, let's pack them
simply in an easy-to-remember function call:
    static uint32_t msPrevious = millis();
    if (waitIsOver(msPrevious, msWait)) doSomething();
If we call the function waitIsOver() in different places
in the main program or other functions, we have to remember the
msPrevious from function call to function call.
We do this by giving the function a reference to a static variable
as an argument when it is called. Let's write the whole thing as a
ternary expression, we finally get the following function:
    /**
     * Returns true, as soon as msWait milliseconds have passed.
     * Supply a reference to an unsigned long variable to hold
     * the previous milliseconds.
     */
    bool waitIsOver(uint32_t &msPrevious, uint32_t msWait)
    {
      return (millis() - msPrevious >= msWait) ? (msPrevious = millis(), true) : false;
    }
If the variable msPrevious is defined globally, we do not need the keyword static.
As an example of how to use the function, here is a short program with
three consecutive function calls in the loop(). Guess what the program does.
    uint32_t msWait  = 50;
    uint32_t msPrevious0 = millis();
    uint32_t msPrevious1 = millis();
    uint32_t msPrevious2 = millis();

    // Toggle builtin led
    void doSomething()
    {
      digitalWrite(LED_BUILTIN, !digitalRead(LED_BUILTIN));
    }

    void setup()
    {
      pinMode(LED_BUILTIN, OUTPUT);
    }

    void loop() // Guess what I'm doing
    {
      if (waitIsOver(msPrevious0, msWait)) doSomething();
      if (waitIsOver(msPrevious1, 1000))   msWait += 10;
      if (waitIsOver(msPrevious2, 30000))  msWait = 20;
    }
2. Heartbeat
Often we would like to have a LED blink in our program, be it as a warning,
as an error indication or to display normal functionality. Because this is
quickly written down as a combination of
digitalWrite(pinLed,!(digitalRead(pinLed)))
and delay(msWait), we don't bother to write a more general
function that might be useful in other situations.
But wouldn't it be nice to have a function that allows us to specify
the number of pulses per unit of time and the pulse duration or duty cycle?
So let's do it!
I don't know who was the first to release a flasher with the modulo approach
presented here, but this solution seems to have been known since the first
days of the Arduino.
See forum.arduino.cc
or Uri Shaked
    const uint8_t PIN_HEARTBEAT = LED_BUILTIN;
    void heartbeat(unsigned long nBeats, unsigned long nSecs, unsigned long dutyOrPulseWidth, bool duty=true)
    {
      if (duty) dutyOrPulseWidth = dutyOrPulseWidth < 100 ? dutyOrPulseWidth : 50;
      unsigned long period = 1000 * nSecs / nBeats;
      unsigned long pulseWidth = duty ? period * dutyOrPulseWidth / 100 : dutyOrPulseWidth;
      digitalWrite(PIN_HEARTBEAT, millis() % period < pulseWidth ? LOW : HIGH);
    }
Call the function in the main loop or in case of an unrecoverable error
in a blocking endless loop like this:
while(true) heartbeat(3,1,50);
Some examples:
    Example1: heartbeat(7, 13, 15)
              flash the LED 7 times in 13 seconds with a dutycycle of 15%

    Example2: heartbeat(8, 15, 4);
              period = 15000/8 = 1875ms, pulsewidth = 4% = 75ms (default duty=true)

    Example3: heartbeat(8, 15, 4, false);
              period = 15000/8 = 1875ms, pulsewidth = 4ms (duty=false)
3. Simple Square Wave Generator
The heartbeat() function presented above can also be used in
general as a function generator. To increase the possible frequency range,
we use the micros() function instead of millis().
If we are using multiple function generators, we may also need a phase shift.
With these additions, our function generator looks like this:
digitalWrite(PIN_PHASE_0, (micros() - phase_0) % period < pulsewidth ? HIGH : LOW);
To make things a bit clearer, let's implement a 50 Hz 3-phase system, but
slow it down by a factor of 100 so that we can observe the voltages of the
phases with 3 LEDs.
    const uint8_t PIN_PHASE_0 = D3;
    const uint8_t PIN_PHASE_1 = D4;
    const uint8_t PIN_PHASE_2 = D5;

    const uint32_t period     = 2000000;      // ==> 2 s / 0.5 Hz
    const uint32_t pulsewidth = 1000000;      // ==> 1 s / 50 % dutycycle

    constexpr uint32_t phase_0 = 0;               // 0°
    constexpr uint32_t phase_1 = period / 3;      // 120°
    constexpr uint32_t phase_2 = 2 * period / 3;  // 240°

    void setup()
    {
      pinMode(PIN_PHASE_0, OUTPUT);
      pinMode(PIN_PHASE_1, OUTPUT);
      pinMode(PIN_PHASE_2, OUTPUT);
    }

    // 3-phase generator
    void loop()
    {
      digitalWrite(PIN_PHASE_0, (micros() - phase_0) % period < pulsewidth ? HIGH : LOW);
      digitalWrite(PIN_PHASE_1, (micros() - phase_1) % period < pulsewidth ? HIGH : LOW);
      digitalWrite(PIN_PHASE_2, (micros() - phase_2) % period < pulsewidth ? HIGH : LOW);
    }
As shown in the program its easy to generate 3-phase square waves like this:
             _____       _____       _____
    Phase 0 |     |_____|     |_____|     |_____|    0°
                 _____       _____       _____
    Phase 1 ____|     |_____|     |_____|     |__  120°
            __       _____       _____       ____
    Phase 2   |_____|     |_____|     |_____|      240°
In theory we can get a minimal period of 2 μs and a minimal pulsewidth of 1 μs
but in praxis the modulo operation, the digitalWrite() function and the main loop
are continuously called and take a lot of time. Further the Arduino reference says
that the micros() counter has at best a resolution of 4 μs.
With an Arduino Uno some 100 Hz with tolerable jitter are realistic but with an
ESP32 the limit is much higher.
- pros
- - simple implementation in one line of code
- - very long periodes achievable
- - synchronized but phase-shifted signals can be easily generated
- cons
- at frequencies > 100 Hz the jitter is considerable
You can download more examples compilable for Arduino UNO, Wemos ESP8266 or Doit ESP32 Dev Kit.
The zip-file contains the complete PlatformIO project.
4. Show nearby WiFi networks
    /**
     * Use a raw string literal to print
     * nearby WiFi networks with SSID und RSSI
     */
    void printNearbyNetworks()
    {
      int n = WiFi.scanNetworks();
      Serial.printf(R"(
Nearby WiFi networks:
--------------------
)");
      for (int i = 0; i < n; i++)
      {
        Serial.printf("%s\t%d\r\n", WiFi.SSID(i).c_str(), WiFi.RSSI(i));
      }
    }
5. Show WiFi connection details
    /**
     * Use a raw string literal to print a formatted
     * string of WiFi connection details
     */
    void printConnectionDetails()
    {
      Serial.printf(R"(
Connection Details:
------------------
  SSID       : %s
  Hostname   : %s
  IP-Address : %s
  MAC-Address: %s
  RSSI       : %d (received signal strength indicator)
  )", WiFi.SSID().c_str(),
      WiFi.hostname().c_str(),  // ESP8266
      // WiFi.getHostname(),    // ESP32
      WiFi.localIP().toString().c_str(),
      WiFi.macAddress().c_str(),
      WiFi.RSSI());
    }
6. Initializing the WiFi
The routine below tries to initialize the WiFi connection and handles all possible
failures. The processor is restarted after 5 retries. Please notice that we
need a call to WiFi.config() to set the hostname of an ESP32 so it is
visible in the router.
    void initWiFi()
    {
      uint8_t retries = 0;
      constexpr char hostname[] = "esp-host";
      Serial.printf("Connecting to %s ...", ssid);
      //WiFi.config(INADDR_NONE, INADDR_NONE, INADDR_NONE);  // this line only needed for ESP32 to set the hostname
      //WiFi.setHostname(hostname);  // ESP32
      WiFi.hostname(hostname);       // ESP8266

      WiFi.begin(ssid, password);
      while (WiFi.status() != WL_CONNECTED)
      {
        delay(1000);
        if (retries++ > 5) ESP.restart();  // restart processor after 5 failed attempts

        switch(WiFi.status())
        {
          case WL_IDLE_STATUS:      // 0
            Serial.printf("WiFi is idle\n");
          break;
          case WL_NO_SSID_AVAIL:    // 1
            Serial.printf("WiFi no matching SSID found: %s\n", WiFi.SSID().c_str());
            Serial.printf("... cannot proceed\n");
          break;
          case WL_SCAN_COMPLETED:   // 2
            Serial.printf("WiFi scan completed\n");
          break;
          case WL_CONNECTED:        // 3 (never reached because of loop condition)
            Serial.printf("WiFi connected\n");
          break;
          case WL_CONNECT_FAILED:   // 4
            Serial.printf("WiFi connection failed\n");
          break;
          case WL_CONNECTION_LOST:  // 5
            Serial.printf("WiFi connection lost\n");
          break;
          case WL_DISCONNECTED:     // 6
            Serial.printf("WiFi disconnected\n");
          break;
          default:
          break;
        }
      }
      Serial.printf("... WiFi connected.\n");
      printNearbyNetworks();
      printConnectionDetails();
      Serial.printf("\ninitWiFi ===> done\n");
    }
7. Debounced button click
Debouncing buttons is daily business of the microcontroller hobbyist.
Dozens of solutions have been proposed, all more or less useful or elegant.
I find the approach of Elliot Williams particularly attractive:
Part I and Part II
I put the code of Elliot into the function buttonClicked().
Their usage is demonstrated by the little sketch below.
    const uint8_t PIN_BUTTON = 15;

    bool buttonClicked(uint8_t pinButton)
    {
      static uint8_t button_history = 0;
      bool clicked = false;

      button_history = button_history << 1;
      button_history |= (uint8_t)digitalRead(pinButton);

      if ((button_history & 0b11000011) == 0b11000000)
      {
        clicked = true;
        button_history = 0;
      }
      return clicked;
    }

    void setup()
    {
      pinMode(PIN_BUTTON, INPUT_PULLUP);
      pinMode(LED_BUILTIN, OUTPUT);
    }

    void loop()
    {
      if (buttonClicked(PIN_BUTTON)) digitalWrite(LED_BUILTIN, !digitalRead(LED_BUILTIN));
      delayMicroseconds(150);  // needed to decrease the sampling rate to prevent glitches
    }
8. Printing 2-dimensional arrays
We can only print out the elements of a 2-dimensional array if we know its
dimensions, i.e. the number of rows and number of columns. We know the type
(int, float, etc.) of an array element and thus also its size in bytes.
From this we can calculate the number of rows and columns as follows:
    // myIntArray is an array of array[4] of int
    int myIntArray[][4] =
    {
      { 9, 8, 7, 6 },
      { 5, 4, 3, 2 },
      { 1, 1, 1, 1 },
      { 2, 2, 2, 2 },
      { 1, 0,-1,-2 }
    };

    constexpr int A = sizeof(myIntArray);           // nbr of bytes the whole array takes in memory
    constexpr int E = sizeof(myIntArray[0][0]);     // nbr of bytes an array element takes
    constexpr int C = sizeof(myIntArray[0]) / E;    // nbr of columns is (size of first row) / (size of one element)
    constexpr int R = sizeof(myIntArray) / (C * E); // nbr of rows is (size of array / (nbr of columns * size of one element)
With this we can write a function that produces a formatted output of all array elements.
    void printIntArray(int *arr, int nRows, int nColumns)
    {
      for(int r = 0; r < nRows; r++)
      {
        for (int c = 0; c < nColumns; c++)
        {
          Serial.printf("%d\t", arr[r * nColumns + c]);
        }
        Serial.printf("\r\n");
      }
    }
We pass the function a pointer to the array and the number of rows and
columns as arguments: printIntArray((int *)myIntArray, R, C);
With this function we can output any 2-dimensional integer arrays.
But what do we do when we have an array whose elements are not integers,
for example, an array of strings like this, actually an array of pointers
to null-terminated strings?
    // myStringArray is an array of array[5] of pointer to const char
    const char* myStringArray[][5] =
    {
      { "Fee-",        "fi-",   "fo-",    "fum.",   "I"          },
      { "smell",       "the",   "blood",  "of",     "an"         },
      { "Englishman.", "Be",    "he",     "alive,", "or"         },
      { "be",          "he",    "dead,",  "I'll",   "grind"      },
      { "his",         "bones", "to",     "make",   "my"         },
      { "bread.",      "(Jack", "and",    "the",    "Beanstalk)" }
    };

    constexpr int SA = sizeof(myStringArray);             // nbr of bytes the whole array takes in memory
    constexpr int SE = sizeof(myStringArray[0][0]);       // nbr of bytes an array element takes ( a pointer)
    constexpr int SC = sizeof(myStringArray[0]) / SE;     // nbr of columns is (size of first row) / (size of one element)
    constexpr int SR = sizeof(myStringArray) / (SC * SE); // nbr of rows is (size of array / (nbr of columns * size of one element)
Now our print function looks like this:
    void printStringArray(const char** arr, int nRows, int nColumns)
    {
      for(int r = 0; r < nRows; r++)
      {
        for (int c = 0; c < nColumns; c++)
        {
          Serial.printf("%s ", arr[r * nColumns + c]);
        }
        Serial.printf("\r\n");
      }
    }
And we call it like this: printStringArray((const char**)myStringArray, SR, SC);
Its nearly the same code but only the data type and the format-string in the print statement differ.
Hadn't we heard of templates a long time ago in the C ++ lecture? Of course!
With a template as the first argument in the function, it is certainly possible to write
a function printArray for several data types. Now the only thing that worries us is the format
string in printf(). That is why we are now using cout, the standard C ++ method for output.
    template <class arrType>
    void printArray(arrType arr, int nRows, int nColumns)
    {
      for(int r = 0; r < nRows; r++)
      {
        for (int c = 0; c < nColumns; c++)
        {
          cout << arr[r * nColumns + c] << " ";
        }
        cout << "\r\n";
      }
    }
Finally, we get a small program with which we can demonstrate the output of integer,
string, and float arrays.
    #include <iostream>

    using namespace std;

    // myIntArray is an array of array[4] of int
    int myIntArray[][4] =
    {
      { 9, 8, 7, 6 },
      { 5, 4, 3, 2 },
      { 1, 1, 1, 1 },
      { 2, 2, 2, 2 },
      { 1, 0,-1,-2 }
    };

    constexpr int A = sizeof(myIntArray);           // number of bytes the whole array takes in memory
    constexpr int E = sizeof(myIntArray[0][0]);     // number of bytes an array element takes
    constexpr int C = sizeof(myIntArray[0]) / E;    // number of columns is (size of first row) / (size of one element)
    constexpr int R = sizeof(myIntArray) / (C * E); // number of rows is (size of array / (number of columns * size of one element)


    // myStringArray is an array of array[5] of pointer to const char
    const char* myStringArray[][5] =
    {
      { "Fee-",        "fi-",   "fo-",    "fum.",   "I"          },
      { "smell",       "the",   "blood",  "of",     "an"         },
      { "Englishman.", "Be",    "he",     "alive,", "or"         },
      { "be",          "he",    "dead,",  "I'll",   "grind"      },
      { "his",         "bones", "to",     "make",   "my"         },
      { "bread.",      "(Jack", "and",    "the",    "Beanstalk)" }
    };

    constexpr int SA = sizeof(myStringArray);             // number of bytes the whole array takes in memory
    constexpr int SE = sizeof(myStringArray[0][0]);       // number of bytes an array element takes ( a pointer)
    constexpr int SC = sizeof(myStringArray[0]) / SE;     // number of columns is (size of first row) / (size of one element)
    constexpr int SR = sizeof(myStringArray) / (SC * SE); // number of rows is (size of array / (number of columns * size of one element)

    float myFloatArray[][2] =
    {
      { 3.14159265, 355.0 / 113.0 },  // pi    and continued fraction approximation
      { 2.71828182, 193.0 / 71.0  },  // e
      { 0.57721566, 228.0 / 395.0 }   // gamma
    };

    constexpr int FA = sizeof(myFloatArray);
    constexpr int FE = sizeof(myFloatArray[0][0]);
    constexpr int FC = sizeof(myFloatArray[0]) / FE;
    constexpr int FR = sizeof(myFloatArray) / (FC * FE);

    template <class arrType>
    void printArray(arrType arr, int nRows, int nColumns)
    {
      for(int r = 0; r < nRows; r++)
      {
        for (int c = 0; c < nColumns; c++)
        {
          cout << arr[r * nColumns + c] << " ";
        }
        cout << "\r\n";
      }
    }

    void setup()
    {
      Serial.begin(115200);

      Serial.printf("Array size is: %d bytes, Element size is %d, %d rows x %d columns\r\n", A, E, R, C);
      printArray((int *)myIntArray, R, C);

      Serial.printf("\nArray size is: %d bytes, Element size is %d, %d rows x %d columns\r\n", SA, SE, SR, SC);
      printArray((const char**)myStringArray, SR, SC);

      Serial.printf("\nArray size is: %d bytes, Element size is %d, %d rows x %d columns\r\n", FA, FE, FR, FC);
      printArray((float *)myFloatArray, FR, FC);
    }
As a result we get:
    Array size is: 80 bytes, Element size is 4, 5 rows x 4 columns
    9 8 7 6
    5 4 3 2
    1 1 1 1
    2 2 2 2
    1 0 -1 -2

    Array size is: 120 bytes, Element size is 4, 6 rows x 5 columns
    Fee- fi- fo- fum. I
    smell the blood of an
    Englishman. Be he alive, or
    be he dead, I'll grind
    his bones to make my
    bread. (Jack and the Beanstalk)

    Array size is: 48 bytes, Element size is 8, 3 rows x 2 columns
    3.14159 3.14159
    2.71828 2.71831
    0.577216 0.577215
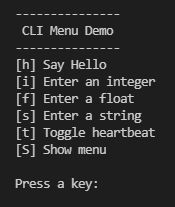
9. A simple CLI Menu
Often when testing a program you want to try different values
and you had to recompile the program over and over again to do this.
Wouldn't it be much easier to have a slim menu system with which you
can enter values and execute actions? That's exactly what the
simple CLI menu does. It has the following features:
- Simple but well structured
- Easy to expand with additional menu items
- Input of integers, decimal numbers and text
- Execute user defined actions
For the sake of simplicity we accept the following disadvantages:
- The input is hidden, i.e. the entered value can only be
displayed when the timeout of the serial interface has expired.
- The main loop is blocked while numbers or text is being entered
The menu look like this:
You have to define a type for the menu items:
typedef struct { const char key; const char *txt; void (&action)(); } MenuItem;
and an array of these menu items:
  MenuItem menu[] =
  {
    { 'h', "[h] Say Hello",        sayHello },
    { 'i', "[i] Enter an integer", enterInteger },
    { 'f', "[f] Enter a float",    enterFloat },
    { 's', "[s] Enter a string",   enterString },
    { 't', "[t] Toggle heartbeat", toggleHeartbeat },
    { 'S', "[S] Show menu",        showMenu },
  };
The functions to show the menu and to call the actions are generig.
Even the setup() und the main loop() look always the same:
  void showMenu()
  {
    // title is packed into a raw string
    Serial.print(
    R"TITLE(
  ---------------------
   Your CLI Menu Title
  ---------------------
  )TITLE");

    for (int i = 0; i < nbrMenuItems; i++)
    {
	  Serial.println(menu[i].txt);
    }
    Serial.print("\nPress a key: ");
  }

  void doMenu()
  {
    char key = Serial.read();
    Serial.print(CLR_LINE);
    for (int i = 0; i < nbrMenuItems; i++)
    {
	  if (key == menu[i].key)
      {
	    menu[i].action();
	    break;
	  }
    }
  }

  void setup()
  {
    Serial.begin(115200);
    showMenu();
  }

  void loop()
  {
    // handle the menu
    if (Serial.available()) doMenu();
  }
The only thing you need to implement on your own
are the menu actions that implement your functionality.
Interested? Please download the entire program code. The zip-file
contains the complete PlatformIO project.