Controlling 2 brushed DC motors simultaneously

1. Features

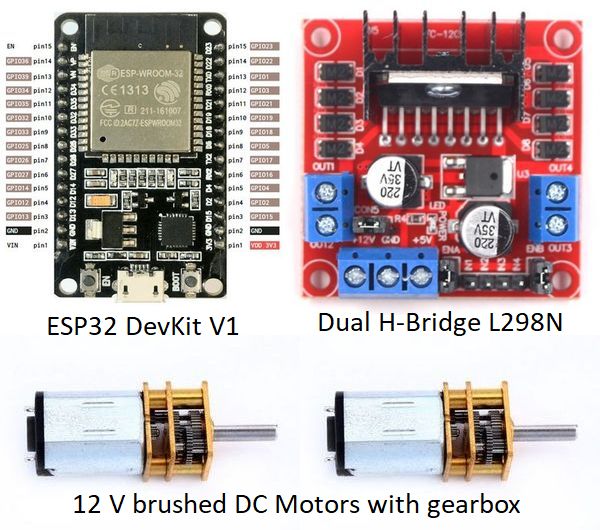
The project shows how a C++ motor class is designed that allows 2 DC motors to be controlled independently of each other at the same time. The double H-bridge module L298N, to which 2 motors can be connected, is used to drive the motors. Two control inputs make it possible to change the direction of rotation and another input controls the speed of rotation with the aid of a pulse-width-modulated (PWM) signal.

The ESP32 ledc subsystem provides functions for the configuration of the PWM.

2. Specification

The C ++ motor class should meet the following requirements:

We should be able to specify all required parameters in the class constructor. These are the the following: To control the motor we implement the following methods:
run(speed)
Runs the motor with the given speed = 0..100%
This range is independent from PWM resolution
The range 0..255 for 8 bit or 0..1023 for 10 bit PWM resolution is always mapped to 0..100%
accelerate(speedFrom, speedTo, msWait)
Accelerate the motor speed in steps of 1%. The time between steps defaults to 10 ms,
so an acceleration from 0 to 100% takes 1sec. The default value can be overwritten.
speedFrom/speedTo = 0..100%
The speed is decelerated if speedFrom > speedTo
rotate(rotation)
Sets the direction of rotation = CW (clockwise) or CCW (counterclockwise)
rotation()
Returns actual direction of rotation (CW / CCW)
reverseRotation()
Switches direction of rotation from CW to CCW or vice versa
brake()
Stop the motor immediately by connecting both motor connections
to ground. Now the back emf forces the motor in the opposite
direction and slows it down in much less time than freeweehling.
runFor(speed, msToRun)
Runs the motor at the given speed for msToRun milliseconds
This method must bee called in a loop e.g. of a state machine
waitFor(msToWait)
Does nothing for msToWait milliseconds
Used to pause the motor for a given time
This method must bee called in a loop e.g. of a state machine
speed()
Returns actual speed in % (0..100)
so making use of the back emf to force the motor in the opposite direction.
Calling run(0) also stops the motor but leaves it freeweehling.
id()
Returns the one character ID of the motor instance
printConfigData()
Prints configuration data of the motor instance

3. Parts

Parts needed for the motor controller
parts

4. Wiring


                              .---.
                              |   |
                             .-.  |
                            ( M ) | Motor_A
               .----.        `-´  |
               |    |         |   |
           +  .-.   |   .-----o---o------------.
  6 .. 12V   ( V )  |   |  M1_A   M2_A         |
           -  `-´   |   |                      |
               |    `---o 12V                  |
  ESP32 GND ---+--------o GND                  |
                    out o 5V                   | 
                        |           L298N      |
                        |        Dual H-Bridge |
  ESP32 18 -------------o EN_A                 |
        22 -------------o IN1_A                |
        23 -------------o IN2_A                |
         2 -------------o IN1_B                |
         4 -------------o IN2_B                |
        15 -------------o EN_B                 |
                        |                      |
                        |  M1_B   M2_B         |
                        `-----o---o------------`
                              |   |
                             .-.  |
                            ( M ) | Motor_B
                             `-´  |
                              |   |
                              `---`
            
To enable the PWM on the L298N module don't forget to remove the jumpers connecting the EN pins to logic HIGH.

5. Program Code

My programming environment is not the native Arduino™ IDE but PlatformIO™ on top of Microsoft's Visual Studio Code™. This combination offers many advantages and allows a much better structuring of the code into several modules especially when we adopt The Object Oriented way.

The main program uses the class MotorBiDir which hides all the complexity of the delay-less timing from the user so he can concentrate on implementing the tasks for the two motors. These tasks are best implemented as state machines. Some examples are shown in the code.

Note: A future expansion will use the two cores of the ESP32 to implement the necessary multitasking.

Interested? Please download the entire program code. The zip-file contains the complete PlatformIO project.

My programming environment is not the native Arduino™ IDE but PlatformIO™ on top of Microsoft's Visual Studio Code™. This combination offers many advantages and allows a much better structuring of the code into several modules especially when we adopt The Object Oriented way.